Heart Rate Zones Explained: The 5-Zone HR Model for Group Fitness
Heart Rate Zones explained using the [five-zone heart rate model](/blog/gym-buddy-apps). Learn how maximum heart rate and resting heart rate affect training intensity, and how heart rate zones in group training improve safety, pacing, and motivation. See how Fit Viz displays heart rate zones on gym screens with integrated timers and workout guidance for a more consistent class experience.

If you’ve ever looked up at a gym display or down at your watch and seen a spectrum of colors, you’ve seen Heart Rate Zones in action. Those colors aren’t decoration - they’re one of the most practical tools for understanding intensity in real time, without guessing. The moment you learn what the zones mean and how they relate to your own physiology, workouts become more intentional, safer, and easier to coach - especially in heart rate zones in group training environments.
We’ve polished this guide to build on the same core ideas as our original article (the five zones, why visualizing them matters, and why group displays work) and expanded them into a better resource by adding some of the the missing pieces most posts skip: maximum heart rate, Resting Heart Rate, and how to apply the zones in real programming with modern studio tech like Fit Viz.
Our key focus areas are:
- The five-zone heart rate model and what each zone does for adaptation
- How to set zones using maximum heart rate (and why accuracy matters)
- Why Resting Heart Rate helps validate progress and readiness
- How heart rate zones in group training create better coaching, safer intensity, and higher retention - especially when Fit Viz makes zones visible on big screens
What are Heart Rate Zones?
Heart Rate Zones divide training intensity into ranges based on a percentage of your maximum heart rate (often written as MHR). Each zone corresponds to a different level of cardiovascular stress and a different training outcome - recovery, endurance, aerobic capacity, threshold, and peak power.
Most modern systems - including studio displays - use a standardized five-zone heart rate model because it’s easy to understand at a glance and works across many training styles (HIIT, strength conditioning, hybrid, bootcamp, cycling, and more).
Why zones beat “go hard”
Perceived exertion (how hard you think you’re working) is useful - but it’s inconsistent. Sleep, caffeine, stress, hydration, and excitement can all distort how a workout feels. Heart rate zones provide a “second opinion” based on your body’s internal response, not your mood.
That matters in real gyms because:
- Coaches can cue intensity objectively (“hold Zone 3,” “recover to Zone 2”)
- Members can self-regulate without feeling singled out
- The room stays safer by reducing sustained redline time
- Effort becomes measurable for everyone, not just the fittest people in class
The five-zone heart rate model (and what each zone is for)
Below is the five-zone heart rate model most systems use. Colors vary slightly across brands, but the physiology is the same.
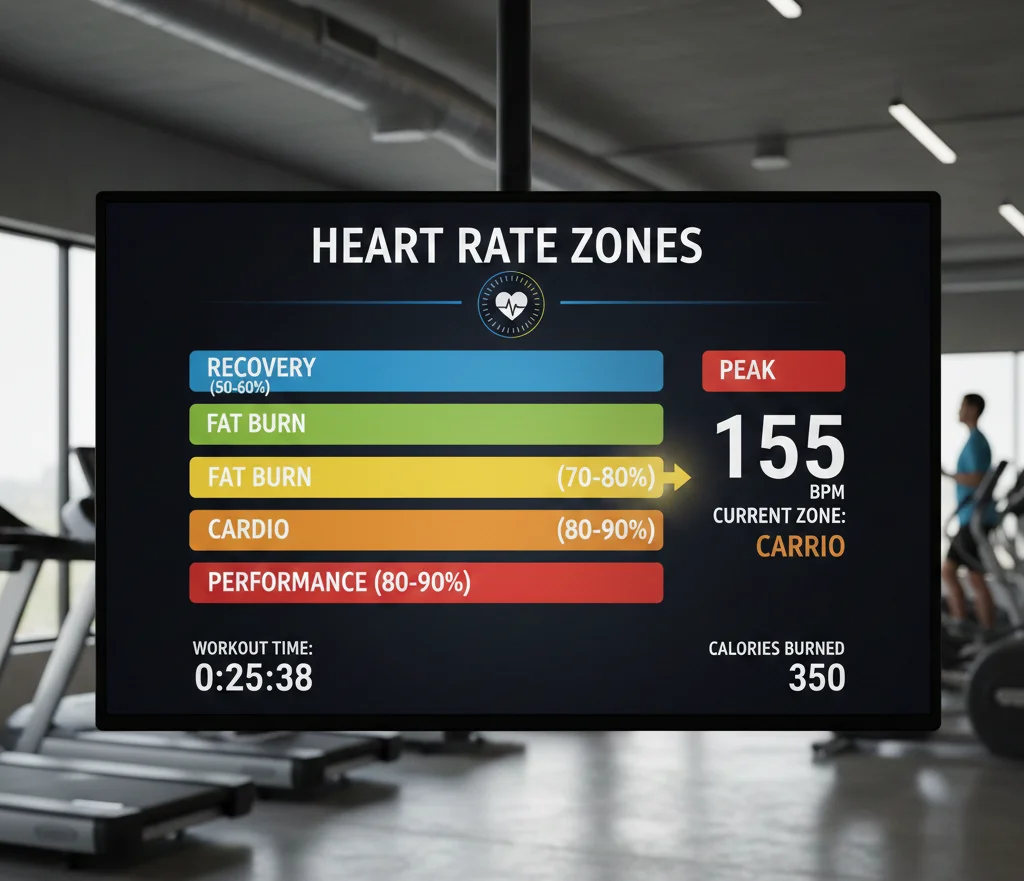
Zone 1: Warm-up and recovery (50–60% of maximum heart rate)
Zone 1 is the foundation of good training. It increases blood flow, raises tissue temperature, and prepares joints and muscles without creating meaningful fatigue.
Best for:
- Warm-ups and cool-downs
- Recovery sessions
- “Flush” days after heavy training
- Beginners building comfort with movement
Coach cue: If members can’t breathe comfortably in Zone 1, you’re warming up too hard.
Zone 2: Aerobic base and endurance (60–70% of maximum heart rate)
Zone 2 is often called the “endurance” or “fat burn” zone because it supports aerobic development and is sustainable for a long time. Conversation should still be possible.
Best for:
- Steady-state cardio (bike, row, run)
- Longer circuits with controlled pacing
- Recovery-biased training blocks
- Improving efficiency and “engine”
Why it matters for performance: A stronger Zone 2 base typically improves recovery between high-intensity intervals. It’s the foundation that makes hard workouts repeatable.
Zone 3: Aerobic training and sustainable challenge (70–80% of maximum heart rate)
Zone 3 is where work becomes demanding. Breathing increases, and you can’t talk as easily - but you’re not in panic mode. Many coaches call this the “sweet spot” because it can drive meaningful aerobic improvement without the repeated stress of constant max-intensity efforts.
Best for:
- Longer intervals (3–8 minutes)
- Moderate-hard circuits where pacing matters
- Hybrid training (strength + conditioning)
- “Tempo” efforts that build work capacity
Coach cue: Zone 3 should feel like “I’m working,” not “I’m dying.” If your entire class lives in Zone 4–5 every day, it’s not a training plan - it’s fatigue accumulation.
Zone 4: Threshold and high intensity (80–90% of maximum heart rate)
Zone 4 is hard. Talking becomes difficult, lactic acid accumulates, and maintaining output becomes a skill.
Best for:
- Interval training
- Performance-focused conditioning
- Threshold development (sustaining tough effort)
- Competitive-style workouts
Coach cue: Zone 4 is powerful, but costly. Use it deliberately - don’t let every class become a threshold test.
Zone 5: Maximum effort (90–100% of maximum heart rate)
Zone 5 is your top gear. It’s typically sustainable only in short bursts (sprints, short hill pushes, final-minute efforts).
Best for:
- Sprint intervals (10–60 seconds)
- Peak power and speed work
- Short finishers where form stays safe
- Controlled, rare “all out” efforts
Coach cue: Zone 5 is a spice, not a main course. The best programs earn Zone 5 by building Zone 2–3 capacity first.
Maximum heart rate: the number that sets everything else
Your maximum heart rate determines your zone boundaries. If your max is set incorrectly, every zone can be distorted:
- Too low → you “hit Zone 5” too easily and pacing becomes misleading
- Too high → you never reach higher zones, and intensity cues don’t land
How maximum heart rate is commonly estimated
Many wearables start with an age-based estimate. That’s fine as a starting point, but it’s not precise for everyone. Two people the same age can have very different true max heart rates.
Better approaches include:
- A field test (progressive effort under supervision)
- Using the highest reliable peak you’ve seen in real training over time
- Coach-led assessment during a controlled interval protocol
Practical tip for facilities: Treat the first 2–4 weeks of heart rate training as calibration. Encourage members to wear devices consistently so the system can learn realistic peaks, trends, and responses.
Why Fit Viz benefits from accurate maximum heart rate
In a Fit Viz-powered studio, the zone board becomes a shared language. But it only works when zones are meaningful. A good max heart rate calibration improves:
- Fairness (effort is truly relative to each member)
- Coaching accuracy (“recover to Zone 2” actually means Zone 2)
- Safety (fewer false “redline” panics)
- Motivation (members trust the system)
Resting Heart Rate: the recovery metric most gyms ignore
While max heart rate sets your zones, Resting Heart Rate helps you interpret your readiness and progress across weeks.
Resting Heart Rate is your heart rate when you’re truly at rest - ideally measured first thing in the morning, consistently, under similar conditions. It’s influenced by:
- Aerobic fitness
- Sleep quality
- Stress load
- Hydration
- Illness
- Accumulated fatigue
What changes in resting heart rate usually mean
- Trending down over months often correlates with improved aerobic efficiency (not guaranteed, but common)
- Sudden increase for several days can signal fatigue, poor recovery, dehydration, stress, or illness
- Higher-than-normal after a hard block is common; it can normalize after deloading or recovery days
For coaches and facilities, resting heart rate is valuable because it helps explain what members feel:
- “Why did Zone 4 feel harder today?”
- “Why did my heart rate spike early?”
- “Why do I feel flat even though I’m motivated?”
How Fit Viz can use resting heart rate contextually
Fit Viz is most powerful when it connects the data members already have (wearables, training history, heart rate trends) to the class experience. Even if you don’t display resting heart rate on the gym floor, it can inform:
- Scaling recommendations
- Recovery-focused class suggestions
- “Hold Zone 2–3 today” guidance
- Coaching conversations that feel personal and precise
Why visualizing Heart Rate Zones matters (especially on shared screens)
Seeing Heart Rate Zones on a shared display changes how people interpret effort. Instead of comparing speed, weight, or athleticism, the room compares relative intensity - what’s happening inside the body.
That has three major benefits:
1. It equalizes effort across mixed abilities
A beginner and an advanced athlete can both be in the same zone while doing different external outputs. That makes classes feel inclusive without lowering the bar.
2. It improves safety without making the class “soft”
With zone visibility, coaches can spot prolonged high effort and cue recovery earlier, before form collapses. This is especially useful in HIIT and hybrid formats.
3. It increases motivation through clarity
Many people don’t quit because workouts are hard - they quit because workouts are confusing or feel random. Zones create a clear target:
- “Today is a Zone 2 base day.”
- “Today is a Zone 4 interval day.”
- “Today we spike Zone 5 in short bursts.”
Clarity improves confidence. Confidence improves attendance.
Heart rate zones in group training: how coaching becomes more precise
Heart rate zones in group training are most effective when coaches treat zones like “lanes,” not scores. The goal isn’t to force everyone into the same zone all the time. The goal is to use zones to deliver the intended stimulus.
Here’s how zones map to common class types:
HIIT classes
- Goal: short spikes into Zone 4–5 with recovery to Zone 2–3
- Coach win: keep the room synchronized so “work” is truly work and “rest” is truly rest
- Fit Viz advantage: large display + clear timer + zone board keeps the class honest and aligned
Strength + conditioning (hybrid)
- Goal: strength work in lower zones, then conditioning into Zone 3–4
- Coach win: prevent members from redlining early so strength quality stays high
- Fit Viz advantage: show the workout structure and timer while zones help members pace the conditioning block
Endurance/engine classes
- Goal: longer periods in Zone 2–3, controlled breathing, consistent output
- Coach win: teach restraint (harder than it sounds)
- Fit Viz advantage: zone board makes “easy but consistent” measurable - members can’t pretend they’re going easy if they’re in Zone 4
Beginner-friendly group fitness
- Goal: build confidence, normalize intensity, reduce intimidation
- Coach win: use zones to validate effort (“you’re doing it right”)
- Fit Viz advantage: shared zones remove the “I’m slower so I’m losing” mindset
The Fit Viz difference: turning heart rate zones into a full class operating system
Many gyms treat heart rate as an “add-on” - a separate app, a separate display, a separate workflow. Fit Viz’s advantage is that it’s designed as a connected system:
- Workout display that shows the block structure and movement guidance
- Workout timers that run intervals and transitions automatically
- Heart rate zones displayed clearly for real-time pacing and safety
- Optional: branded visuals and gym music that keep the vibe consistent
This means the coach is no longer managing multiple tools. The screens run the room, while the coach coaches people.
When your system supports the full “class flow,” heart rate training becomes:
- Easier to coach
- Easier for members to follow
- More consistent across instructors
- More valuable as a retention engine
How to implement heart rate zones in your facility without making it complicated
If you’re rolling out zones in a studio or gym, the biggest mistake is over-explaining. Keep it simple and repeatable.
Step 1: Define what “success” looks like for each class type
Examples:
- HIIT: “spike high, recover fast”
- Endurance: “stay mostly Zone 2–3”
- Hybrid: “strength quality first, then controlled Zone 3–4”
Step 2: Teach members one simple rule per zone
- Zone 2: “conversational pace”
- Zone 3: “challenging but sustainable”
- Zone 4: “hard, breathing heavy”
- Zone 5: “short bursts only”
Step 3: Use the screen as the authority
When zones are visible on the wall, you don’t need to micromanage. Members self-correct:
- They back off when they’re redlining too early
- They push when they’re under-target
- They recover more intentionally
Step 4: Build a weekly rhythm
This is where many gyms win retention:
- 2 intensity days (more Zone 4–5 exposure)
- 2 base days (more Zone 2–3 exposure)
- 1 hybrid benchmark day
Members feel progress because the plan is coherent.
Fit Viz helps you deliver this rhythm consistently because the display and timer system keep execution uniform.
FAQs that members and coaches ask
Are heart rate zones accurate on every device?
Different wearables have different accuracy depending on sensor type and placement. Chest straps typically track rapid intensity changes more reliably than wrist-based sensors during certain movements. In group training, consistency matters: using the same device consistently is often more useful than switching devices frequently.
Can maximum heart rate change?
True max heart rate is mostly stable, but it can be influenced by age and testing conditions. The more important practical point: your system should adjust if it’s clear your max estimate is wrong.
What if my resting heart rate is high today?
If your Resting Heart Rate is unusually high for multiple days, it can be a sign to reduce intensity and prioritize recovery. Coaches can suggest a Zone 2–3 day, technique work, or scaled volume rather than forcing maximal output.
Conclusion
Heart Rate Zones turn invisible effort into visible coaching. The five-zone heart rate model gives members a simple framework: warm up in Zone 1, build capacity in Zone 2–3, train performance in Zone 4, and use Zone 5 strategically. When zones are set correctly using a realistic maximum heart rate, and interpreted alongside trends like Resting Heart Rate, training becomes smarter and more sustainable.
The biggest unlock happens in heart rate zones in group training: effort becomes inclusive, pacing becomes coachable, and the room becomes synchronized. Fit Viz amplifies these benefits by making zones visible on gym screens alongside workout flow and timers - so members stay oriented, coaches reduce burnout, and the class experience feels premium and consistent.